
tagged  Getty Images, blogging, photography, social media
Strategic Communication Insights blog
Use newly released Getty images to improve your blog/social media sites
Robert N. Yale Yesterday, Getty Images release more than 35 million images for free non-commercial use. This is a treasure trove of extremely high quality images from the best press photography agency. You can follow this link for full details about how to use these images in your own blog/social media/other non-commercial web properties.
Use appointment slots in Google Calendar to automate office hours scheduling
Robert N. Yale If you're anything like me, you spend too much time emailing back and forth with students to schedule meetings (and let's be honest - any time that you're spending doing a menial task that could be eliminated with technology is time that you aren't being productive or relaxing). Today, Google announced a new feature of their Calendar web app that will seriously simplify office hour scheduling.
The new feature, dubbed 'appointment slots,' appears when you click on a free time space while viewing your calendar.
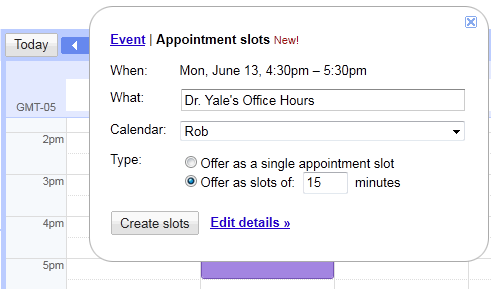
Like a regular events, you can schedule recurring times every week when you hold office hours. Google also provides the option to specify appointment length. Provide your students with the URL to your personal appointment sign-up page (the personal URL will appear when editing details of an appointment slot), and they'll be able to see your available slots and sign up for an appointment.
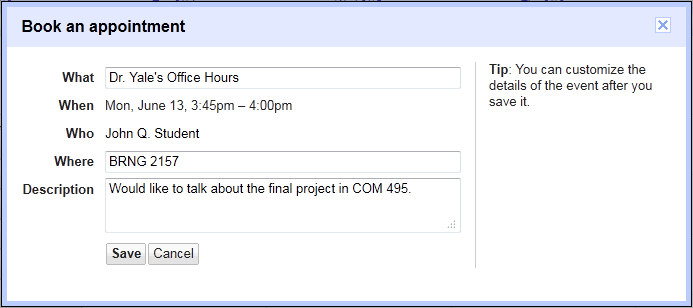
When a student schedules an appointment, the slot he or she selected will disappear from the appointment sign-up page.
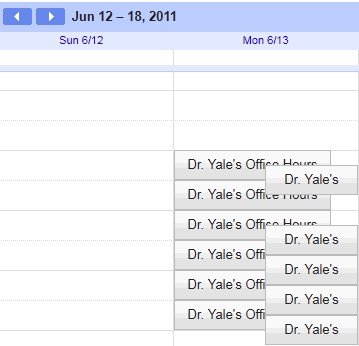
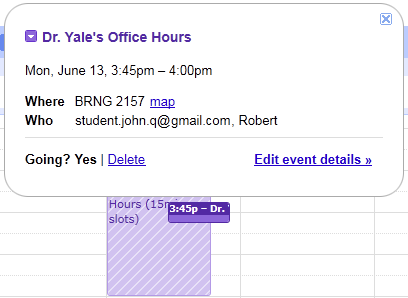
You'll see student appointments auto-populate your calendar and appear on top of your scheduled office hour blocks.
Ready to try it out? Book an appointment with me!
Additional Tips
- Consider using a URL shortening service (bit.ly is my favorite) to create a short (and memorable) URL that redirects to your appointment page. You can paste the short URL on your syllabi, your course website, or even print it out and post it on your office door.
- Traditionally, instructors offer office hours during the same times each week. However, using Google Calendar to automate student appointment scheduling opens up the possibility of having variable office hours, since students can always look online to see when the next available times are and reserve a slot.
- You may need to remind students to put their name in the "Description" field when signing up for appointments. Many people have Google account IDs that are something other than their name (e.g., purpleninjanerd7825@gmail.com).
- If you manually create an appointment during your scheduled office hours, the concurrent appointment slots will still be available through your appointment sign-up page. Don't forget to change duration of the block so you don't end up double-booked.
Update on Wednesday, June 8, 2011 at 1:07PM by
Robert N. Yale
Robert N. Yale
Update
As a reminder - the appointment slots feature is being rolled out over the next few days. If you don't see it yet, or aren't available to make appointments with people who have the feature, just wait a few days for the rollout to complete.
tagged Google Apps, automation, office hours
Use Microsoft Excel to eliminate manual grade calculation
Robert N. Yale I walked through the grad student computer lab today, and heard one of my colleagues talking to herself: "I hate calculating final grades! It takes forever, and I'm always afraid I'm going to make a mistake and keep someone from graduating." It turned out that she was sifting through the gradebook by hand to drop low quiz scores and was manually entering final grades based on the point total.
The great news is - Microsoft Excel can automate these tasks, ensuring mistake-free final grades. Here's how:
Drop lowest score(s)
It's fairly common for instructors to allow students to drop the lowest score or two, especially on assignments like quizzes or short weekly writing exercises. This method will also work for assignments where students are only required to complete a subset of the available tasks (e.g., students must respond to at least 8 of the 10 weekly writing prompts).
Drop single score
To drop a single score in Excel, it is easiest if the columns containing the scores are adjacent to one another. The example below shows a gradebook containing scores for six quizzes in columns B through G.
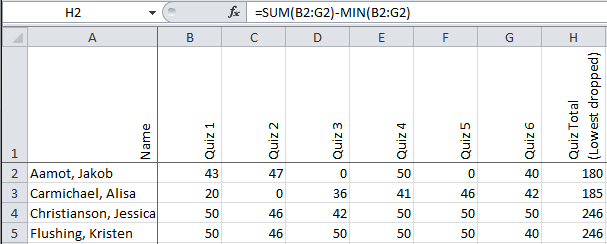
To drop the lowest score and add the remaining scores for hypothetical student Jakob Aamot, use the formula:
=SUM(B2:G2)-MIN(B2:G2)
In words, this formula adds up all of the scores in row 2 columns B through G, then subtracts the minimum (lowest) score in row 2 columns B through G. Once you have the formula in your Excel sheet, you can copy and paste it down through your total column for as many students as you have - Excel will intelligently change the row number in pasted formulas.
Drop multiple scores
To drop multiple scores, a slightly different formula must be used.
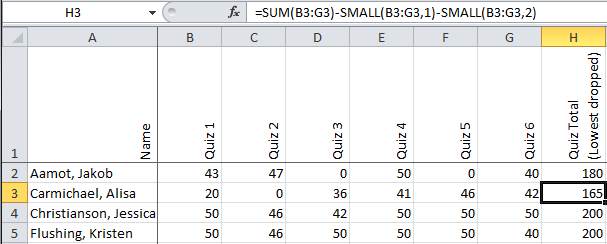
To drop the lowest two scores for hypothetical student Alisa Carmichael, use the formula:
=SUM(B3:G3)-SMALL(B3:G3,1)-SMALL(B3:G3,2)
In words, this formula is adds up all of the scores in row 3 columns B through G, then subtracts the first smallest score in row 3 columns B through G, then subtracts the second smallest score in row 3 columns B through G. The ",1" or ",2" after the cell range B3:G3 tells Excel to drop the first or second smallest score, respectively. If you wish to drop more than two scores, just add an additional "-SMALL(B3:G3,#" to the end of the formula, replacing "#" with the rank of the next highest score to drop.
Convert points or percentages to letter grades
Instead of going through the gradebook and manually entering letter grades based on point totals or class percentages, an Excel formula can automatically report the appropriate letter grade based on your grading scheme.

In this hypothetical example, the course percent earned determines the final grade according to a typical +/- grading scheme. The formula looks big and complicated, but it's really just the same formula repeated over and over with minor modifications. To calculate the final grade for Jakob Aamot, use the formula:
=IF(B2>=97,"A+",IF(B2>=93,"A",IF(B2>=90,"A-",IF(B2>=87,"B+",IF(B2>=83,"B",
IF(B2>=80,"B-",IF(B2>=77,"C+",IF(B2>=73,"C",IF(B2>=70,"C-",IF(B2>=67,"D+",
IF(B2>=63,"D",IF(B2>=60,"D-","F"))))))))))))
In words, this formula looks at the score in row 2 column B. If the number is larger than or equal to 97, it sets the value of row 2 column C to A+. If the number is not larger than or equal to 97, it continues down the formula path until the number in row 2 column B is larger than or equal to the listed value. If none of those numbers work, it sets the value of row 2 column C to F.
If using a point system rather than percentages, you can use the same formula, just replace the percentages with the appropriate cut-off point totals for each grade. Similarly, if your grading scale is different, just replace the current grade designations with your own.
tagged Microsoft Excel, automation, gradebook
Use Adobe Acrobat Pro to make scanned PDFs searchable
Robert N. Yale I'll admit it. I'm a document pack-rat. If it seems like a document might be useful to me at some point, even in the very distant future, I keep it. Several years ago, though, I realized that my filing system was a mess, and it was time to go digital. Even if every single document I had saved was incredibly useful, they'd never be useful if I couldn't find the right file at the right time. (Also, the papers were starting to pile up and turn my office into a huge mess.) My solution was to scan my paper files and organize them digitally. With the excellent OCR (optical character recognition) technology available in Adobe Acrobat Professional, I was even able to recognize the text in the scanned documents, enabling full-file searching in modern operating systems (e.g., Windows 7, OS X, most Linux distributions).
This feature of Acrobat Pro is especially useful for academics - how many times have you downloaded an older journal article and found the PDF contained images rather than text? Not very useful when you'd like to search for key words rather than read through every potentially relevant article...
Here's how to use Adobe Acrobat Pro to turn those image-based PDF files into searchable text PDF files: (Note: You must use Adobe Acrobat Professional for these tasks - Acrobat Reader doesn't have OCR capabilities, nor can it make changes to PDF files. Most well-equipped university computer labs will have Adobe Acrobat Professional available. If not, university students and faculty qualify for steeply discounted educational software prices direct from Adobe or your university bookstore.)
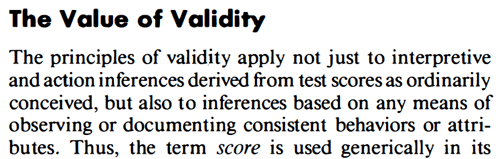
In the example below, I'm using a journal article I downloaded from American Psychologist. When I click in the document to try and select text (a good test for whether the document is already searchable), the entire page is selected in light blue as an image. This indicates that the PDF file is simply a set of page images, which means it isn't searchable.

To use Acrobat's OCR feature, click on the Tools pane, then select Recognize Text.* If you just want to recognize text in the open PDF file, choose In This File. If you've collected a bunch of PDF documents and wish to recognize them all in a batch operation, choose In Multiple Files.
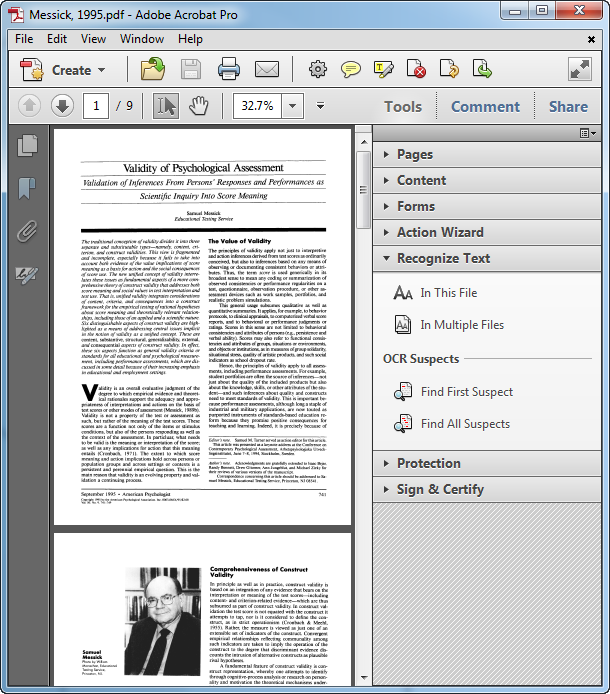
For a single file, you'll see the following options appear:

If you're using Adobe Acrobat 8 or earlier, select OK, and Acrobat will begin recognizing the text on each page. Adobe Acrobat versions 9 and above contain an alternative PDF output style called ClearScan. This option replaces the text in the file with a custom Adobe vector font, which produces much clearer text and significantly smaller file sizes. This option does the best job of enhancing scanned document quality while producing reasonably sized PDF files for emailing or posting to course websites. To select ClearScan, click on the Edit button, then change the PDF Output Type: to ClearScan. Click on OK and OK again to begin the recognition.
Although ClearScan does take a bit longer to process, the results are outstanding, as you can see in the following images. The differences are even more dramatic with poorer quality initial scans.
Without ClearScan

With ClearScan
When the OCR process is complete, you'll notice that the document text is now selectable (and searchable).
Be sure to save the new (searchable) PDF file!
Additional Tip:
If you're using Adobe Acrobat in a computer lab, it's very likely that PDF files will open by default in Adobe Acrobat Reader. You may need to manually open Adobe Acrobat Pro and then open a PDF file in order to OCR documents.
*Note: In this example, I'm using Adobe Acrobat X Pro. If you have an older version of Adobe Acrobat, select the Document menu, OCR Text Recognition, Recognize Text Using OCR.
tagged Adobe Acrobat Pro, OCR, scanned PDF
Customize default font, paragraph, and spacing settings in Microsoft Word
Robert N. Yale 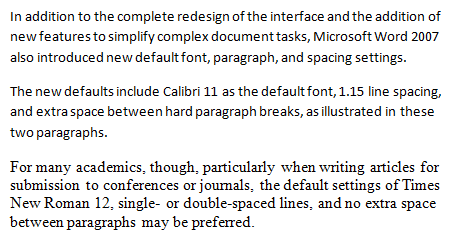
I can’t count the number of times I’ve looked over someone’s shoulder and have seen them selecting the text in the document and manually setting the font, paragraph, and style settings back to the Word 2003 defaults (or something closely approximating it).
Here’s how to change the default settings for new documents in Word 2010. If you are still using Word 2007, the process explained below is similar enough that you should still be able to follow along. In this example, I’ll be setting the defaults to Times New Roman 12, single-spaced, with no extra space between paragraphs. If you prefer a different default configuration, simply adjust these instructions accordingly.
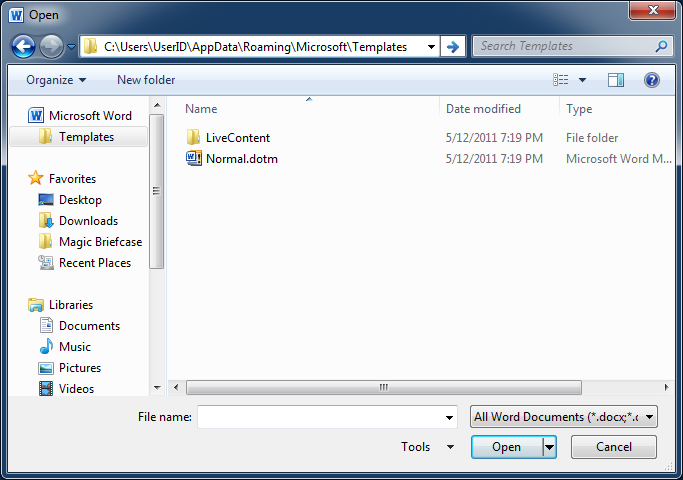
Microsoft Word’s default document settings are saved in a document template file named Normal.dotm. Any changes made to the settings in this document template will become the new default settings in Word.
Step 1: Open normal.dot
Launch Microsoft Word. Click on File | Open. At the top of the left-hand navigation pane, expand Microsoft Word, click on Templates, and then select the file Normal.dotm and click Open. Alternatively, you can manually navigate to:
C:\Users\YourUsername\AppData\Roaming\Microsoft\Templates
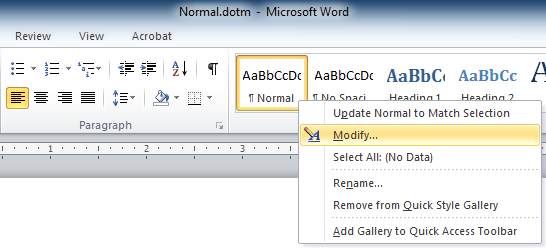
Step 2: Modify settings for the ‘Normal’ text style
On the Home tab in the Styles section, right click on Normal and select Modify.
 In the Formatting section, change the font to Times New Roman and the size to 12. If you desire different default font settings, select those instead. At the bottom of the Modify Style dialog box, select New documents based on this template.

Step 3: Change paragraph and spacing settings
Click on Format | Paragraph. In the Spacing section, change After to 0 pt and Line spacing to Single. Click OK.

Click OK again. Save and close Normal.dotm.
Next time you create a new document in Microsoft Word, these default settings will be applied. This method also works for changing default margins, page orientation, etc. Happy formatting!
tagged Microsoft Word, document formatting, normal.dotm